Showing posts with label easy. Show all posts

November 23, 2010

Tips To Make Cooking Quicker And Easier

It occurred to me that I have a few little tricks I use to make decent meals quickly and without a lot of fuss. Nothing groundbreaking here; these are mostly common sense. Still, they may be helpful to consider, especially if you're feeling culinarily-stressed around the holidays.

-Make grains in large batches: About once a month, I make a huge pot of brown rice. I then section it out into individual servings and freeze them in plastic bags, then defrost them as needed. This is great because I'm not always stuck waiting for rice to cook (it takes so long!) and also because I can defrost exactly the amount if rice that is necessary for the recipe I'm making (no waste!).

I also like to make a big pot of quinoa on Sunday nights so I can use it as a side dish or base all week.

-Buy preminced garlic: I have a feeling a lot of people will find this sacrilegious, but for me it's much easier to just plop some already chopped garlic out of a jar than deal with buying cloves and slicing them as needed. Cuts prep time quite a bit for me, as I use garlic very frequently, and a big jar lasts me months.

-Always have canned tomatoes in the cabinet: I buy canned tomatoes almost every third time I grocery shop, because I use them so often. They're perfect as a base for so many different things, including chili, pasta sauce, tacos, enchiladas, jambalaya, whatever. The store brand ones are often very cheap and already flavored with stuff like oregano and green chile, too.

-Don't be afraid to modify the recipe: If you don't have something you need, don't be afraid to omit it or substitute for something similar. This recipe tasted perfectly fine without onions, and this one was fine with extra spinach instead of kale. For baked goods, I especially like subbing for eggs with applesauce; the recipe always ends up really moist (use about 1/4 cup applesauce per egg). For an added bonus, it's vegan.

Have any similar time-saving tips? Anything you do to simplify recipes or simplify cooking in general?

On an unrelated note, here we are, your Master of Fine Eats bloggers, dressed up and clowning around at an event last weekend.

Photo by Yvette Lopez

November 14, 2010

In Which I Finally Make Frittata

If you've been reading this blog for any length of time, you know I am a big fan of egg dishes (see here, here, and here). Eggs are easy, healthy, and can be dressed up to taste really delicious with only minor time and effort.

I frequently come across frittata recipes on food blogs, especially on 30 Bucks A Week (they are always whipping up these incredible looking frittatas from random ingredients they have laying around. It's intimidating in a weird foodie way). I never had the oven-safe pan required to make one, though, until I recently bought a cast-iron skillet.

I like making brunch on the weekends, so I decided to try a frittata last Sunday morning and was pleasantly surprised at how easy it actually was. I sort of quickly threw this together after googling a few recipes, and it came out really well. It's easy enough that it doesn't feel like work, but tastes good enough that it feels a bit more festive (special? weekend-worthy? I don't know) for a Sunday brunch. I'm thinking frittatas could also be good for dinner, with a little salad and some some crusty toasted bread.


Spinach, Asparagus, & Feta Frittata
hands-on time: 10 min total time: 20 min

6 eggs (I used 2 eggs, 4 egg whites)
splash of milk
7 or 8 asparagus stalks, woody ends removed, chopped into 1 in pieces
handful of torn baby spinach
2-3 green onions, chopped
feta cheese to your liking (I used an herb blend)
2 glugs olive oil
chopped garlic to taste
an oven safe pan or skillet

1. Preheat oven to 450. 
2. Saute the asparagus with the chopped garlic and olive oil, about 5 minutes, until it turns a bright green.


3. Stir in the spinach and green onions, cook until spinach wilts.


4. Beat eggs thoroughly with just a splash of milk added, then pour into pan, making sure eggs are evenly distributed throughout pan.
5.  Sprinkle about half of the feta on top, then cook eggs and vegetables on low heat for 4-5 minutes.

6. Once the mixture has begun to set (but there is still egg liquid in the pan), add the rest of the feta and transfer to oven for 7-10 minutes.
7. The frittata is ready when the cheese is melted and the egg is set, but not browned; you can try inserting a fork or toothpick to see if it comes out clean. 


The feta that I used was extremely salty, so there was no need to add any more salt to this recipe, even after cooking. I loved this frittata so much I made another one the very next day, with tomatoes, spinach, and shredded Mexican cheese. I think the shredded cheese may have actually turned out better than the feta, and the tomatoes added some necessary juiciness. This would be easy to tweak by using different greens, adding onions or other vegetables, or changing the ratio of egg whites to eggs. 

September 15, 2010

Cooking for Workshop

All of the workshops here at NMSU are at night, usually from 5-7:30pm or occasionally 5:30-8 pm. Prime dinner hour. It's hard to sit for 2 1/2 hours and be critical and smart when you're starving, so for the last two years, our poetry workshop has had a tradition of asking each person to bring food for the class once each semester.

We've had quite the range of meals since I've been at NMSU. Pizza ordered ten minutes before class began (cough cough Robbie), cold gazpacho, banana pudding, PB&Js, enchiladas, zucchini bread, eggrolls, veggie platters from Albertson's, chips and salsa, candy; pretty much everything on the spectrum. It's always interesting to me to see what my classmates bring to share. I'm clearly into food, but I'm also really (creepily? is this abnormal?) interested in other people's eating habits: what other people like to eat, the effort they put into food, and what they might deem appropriate food for certain settings. I also think that class feels just a little bit more festive when you can pass cookies around the table.

It's important, of course, to not bring something too involved; you don't want people concentrating more on your food than on the work in front of them. Messiness is also kind of out; having to pass back comments with melted ice cream or something like that on them is not ideal.

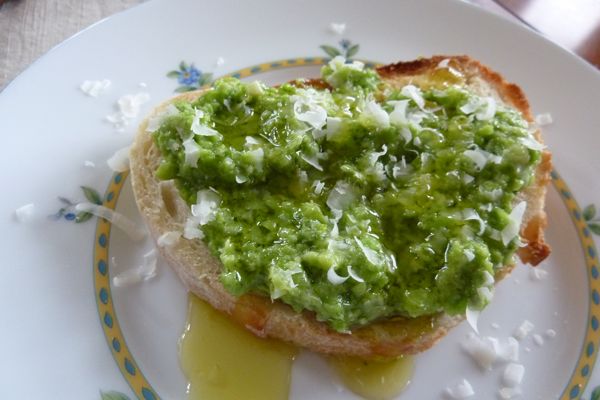
Last night, it was my turn to provide food for my fellow poets. In the past I've made cornbread, spinach-bean dip, and pasta salad. I didn't have much time to actually make anything too involved, but I always want to bring something good and a little unusual, more than a bag of pretzels and a box of gingersnaps, you know? I find that finger-foods usually work well, so I brought sliced french bread, crackers, sharp cheddar cheese, apples, and hummus. I had also seen this recipe for Mint-Pea Dip and was looking for a chance to make it.  Mint-Pea dip sounds borderline gross, I think, but I promise you it's refreshing, delicious, and wonderful on bread. It consists of frozen peas, fresh mint, lemon juice, salt, pepper, and parmesan cheese; that's all.

Photo courtesy of DinnerALoveStory.com

Everything seemed to be a hit, including the dip, which I was a little wary about. What would you make if you were cooking for a group in a classroom setting?

June 3, 2010

Swiss Chard Quiche

My trip to Central America has been significantly delayed due to the eruption of the volcano Pacaya in Guatemala, as well as tropical storm Agatha, so I've been hanging out in Baltimore for a bit longer than I originally planned. Check out the sinkhole caused by the storm in Guatemala City:


!!!!!!!!!!!!!!!!!!!!!!!!!!!!!!!

Luckily, I anticipate spending most of my time in Guatemala in the city of Antigua, which is (so far) sinkhole-free. Since I've had a longer stay in Baltimore, I've had more time to cook, and I have successfully converted my family to liking swiss chard. Last night, I made an onion-chard quiche for dinner; I'm a big fan of quiches because they're easy and easily customizable. Quiche also seems appropriate at any time of day; it's not at all like eating a hamburger at 9 am, which always feels weird to me. If you eat a quiche at 9 am, it feels like breakfast. If you eat it at 7 pm, it feels like dinner.


Swiss Chard Quiche

Ingredients:
3 eggs
1 (to 1.5) cups of grated cheese (I used a mix of cheddar and some weird artisanal sundried tomato cheese I found in the fridge)
1 cup milk
3/4 bunch of swiss chard, chopped
3/4 onion, chopped
1 pie crust
couple tablespoons of olive oil
splash of lemon juice
salt and pepper to taste

1. Finely chop the onion and cut the stems off of the chard. Saute in the oil until soft, 5-7 minutes or so.
2. Roughly chop the chard into bite size pieces, add to the pan.
3. Add a splash of lemon juice, cook until chard is fully wilted; it will become much smaller and a much darker green. I added salt, pepper, and garlic powder here, as well.
4. As the chard wilts, blend the milk, eggs and cheese together in a bowl.
5. When the chard is done, stir it into the eggs mixture.
6. Pour mixture into pie crust.
7. Bake at 375 for 35-40 minutes.


8. Let the quiche sit a few minutes before cutting.

We ate the quiche with a tomato, avocado and parmesan salad. This recipe could easily be modified by using spinach in place of chard, leeks in place of onions, adding green onions on top, adding fresh basil, adding tomato, adding green peppers, adding cooked bacon, adding broccoli, you get the picture. Basically, you can modify this recipe to suit your particular tastebuds, using any vegetables you want; just saute them a little before you add them to the egg mixture. I should add I've made basically the exact same quiche without a crust, so if you don't have a pie crust or just want a lighter version of the recipe, it's just as good without. This quiche tastes even better the next day, especially for breakfast.

May 24, 2010

Baltimore, Botulism Benefit & Roasted Garlic


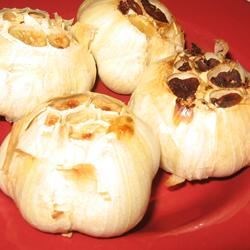
photo courtesy of allrecipes.com. I'll remember to take one next time!

I'm in my hometown of Baltimore, enjoying some time before I head off to Central America for a month (!!!). I haven't been cooking much, although I did make some dill dip for the Baby Bregel-Bausum's Botulism Benefit Bash on Saturday. There was a ton of food and terrific live music (by Earthtone!). Better than that, a lot of money was raised for Sinai Hospital's PICU, where my friend Sarah's baby girl Piper recovered from infant botulism in March. Once the music started, I was completely distracted, so I don't think I actually ate the dill dip I made. I followed my mom's classic recipe, though, so I'm sure it was good.

Perhaps the dill dip recipe will be another post, because last night for dinner I had roasted garlic, and that's what I want to write about. Roasted garlic is incredibly simple to make, tastes amazing, and has multiple uses. I usually eat mine smushed over bread, but you can add it to mashed potatoes, dips or pastas. It's also good on top of pizza, mixed into butter or hummus, or with cheese as an appetizer.

Ingredients
head of garlic (as many as you'd like to make)
salt
pepper
olive oil

1. Pull off most of the garlic skin, leaving the individual skins of the individual cloves.
2. Chop off the end of the head of garlic, exposing the cloves; maybe cut off about 1/2 an inch here.
3. Drizzle with olive oil, then sprinkle some salt and pepper.
4. Bake on a baking sheet at 400 degrees for about 40 minutes. You should be able to smell the garlic. You might need + or - about 5 or 10 minutes, depending on the size of the garlic heads and the strength of your oven.
5. Pull the cloves from the skin with your fingers or a fork.

A quick Google search reveals a bunch of different ways to roast garlic, including in muffin tins or ramekins, covered with aluminum foil, etc. I usually do it bare, but I'm thinking using aluminum foil might be smart.

March 26, 2010

The Four-Minute Magical Breakfast

This is the breakfast that has changed my mornings. I first read about it in a magazine a couple of months ago, decided to try it, and have been hooked ever since; I eat it a minimum of three times a week. I call it "magical" because it is just so good, so fast, so easy, so basic (4 ingredients!) and so healthy (protein and veggies!!), it seems too good to be true. This little egg dish keeps me full and happy for hours, and it is the perfect morning meal when I have a long day of teaching and class ahead of me.

The Four-Minute Magical Breakfast

Ingredients:

2 or 3 eggs
splash of milk
tomatoes, spinach, onions, mushrooms, whatever vegetable(s) your heart desires
small handful of shredded cheese

1. Break the eggs into a fairly deep microwave-safe bowl and add a splash of milk. Whisk with fork.


2. Chop some veggies directly into the bowl. Here I used baby spinach (torn into smaller pieces) and tomatoes. Stir around.


3. Microwave uncovered for 1 minute and 30 seconds.
4. Stir, add small handful of shredded cheese (here I used mozzarella), stir again.
5. Microwave for another 45 seconds to 1 minute depending on your microwave, stir, top with salt and pepper to taste.
6. Eat your scrambled mini-omelet!


Cooking time can vary based on your microwave. You might also want to put a small plate over the top of the bowl to keep the heat in, but this can also affect cooking time. I've heard some people are wary of microwaving eggs, but I love the fact that I don't have to dirty a bowl, a pan, and a cutting board for some good eggs in the morning: as you can see, the whole meal takes place in one little bowl.

One of the best things about this recipe is its versatility. You can make it with egg whites, you can make it with leftover veggies from last night's dinner, you can top it with salsa, you can eat it on toast. Make it spicy with Pepperjack cheese and green chiles, make it Greek with feta. Use more eggs if you're hungrier. Add pre-cooked sausage, add chopped peppers, omit the milk, douse it in hot sauce, use fresh dill or basil---whatever your tastes, you can modify this quick little dish to suit them.

If any of you try this, please let me know what you think. I'm also always open to new suggestions for fast, good and healthy breakfasts, so what do you guys eat in the morning?

March 4, 2010

In Which I Learn to Love Swiss Chard

I started reading food blogs about a year ago, when I was considerably less adventurous in my attitudes towards unfamiliar ingredients. Leeks? Had no idea what they were. Thai fish sauce? Sounded sketchy. Jicama? Ji-what? I kept reading about a mysterious vegetable called swiss chard, and I was getting pissed off. Was it just me? Was I the only person ignorant to the existence of swiss chard? What was this thing that so many food-conscious people were eating and why didn't I know about it? It sounded weird, scary, gourmet-esque, and undoubtedly out of my grad school student price range. Finally, after about the 17th mention of swiss chard, I googled it and set off to the grocery store to try it for myself.

I'm happy to report that swiss chard is neither "gourmet," nor expensive. Swiss chard is a leafy green similar to spinach, but with an earthier, heartier flavor. It's incredibly healthy (check this out), it's fairly filling, it tastes really good, and it's versatile. And at the Albertson's closest to me, it costs about $1.99 for a huge bunch.

I frequently sautee up some chard as a side dish, but I've also used it in soups and in stir-frys. Here is an easy step-by-step recipe for my favorite way to prepare swiss chard, something I call, uncreatively, "Sauteed Garlic Swiss Chard."

Here is what you'll need:


1/4 to 1/2 of a bunch of swiss chard (1/4 is enough for one person)
2 or so tbsp of olive oil
some garlic (however much you like. Yeah, I use the preminced garlic. It's easier!)
salt and pepper to your taste

1. Chop up your chard. The first time I prepared chard, I read that you're supposed to fold/roll the leaf and tear roughly with the knife, away from the center stem. This works pretty well, but do whatever feels natural to you. You will want to chop off the end stems and discard them. They are edible, but they're a bit more sour.

2. Heat the oil in a medium-sized pan. Once it is hot, add the garlic.

3. Once the garlic is just the teensiest bit browned, add in the chopped chard. It will seem like it is way too much, but chard shrinks down quite a bit. Make sure you toss the chard well in the pan, so it becomes covered with the oil. Probably use a spatula or a wooden spoon for this.

4. Keep stirring/tossing the chard around the pan until it becomes wilted and wet, about 5 or so minutes. Once this happens, cook it about one minute more, until it is hot and seems pretty thoroughly cooked. It should look, more or less, like this:


5. Sprinkle on some salt and pepper and eat!

You can also try adding ginger, red pepper flakes, basil, dill, or whatever spice you like for more flavor. Throw some onions, leeks, or asparagus in the pan if you want a greater variety of vegetables.


Here I'm eating chard as a companion to baked eggs and tomato salad. It is a good meal.

February 27, 2010

Quick & Easy Meal

If you're looking for a quick & easy Saturday night meal, I made this for dinner a few nights ago. With only 4 ingredients (not counting salt & pepper), chances are you have everything you need for this sitting in your kitchen right now!* FYI, the chicken was perfectly cooked, and tasted terrific over a box of Goya Mexican Rice.

All credit goes to Kristin of Cheap Healthy Good. Check out her interesting feed-my-fiancee-for-a-week on-$25 experiment, going on right now.

*Note to New Mexicans: If you can, use the El Pinto Medium Salsa that comes in the really big jar--perfect seasoning.

LinkWithin

Related Posts Plugin for WordPress, Blogger...